IPv6
IPv6 is the new version of the Internet Protocol designed to replace the current IPv4. It aims to address issues brought by the growth of the Internet, such as the shortage of IPv4 addresses, and to provide a foundation for future advancements.
CESNET has been working with IPv6 since 1999, when we launched our first experimental IPv6 backbone. Since 2004, we have offered IPv6 as a standard service, fully comparable to IPv4.
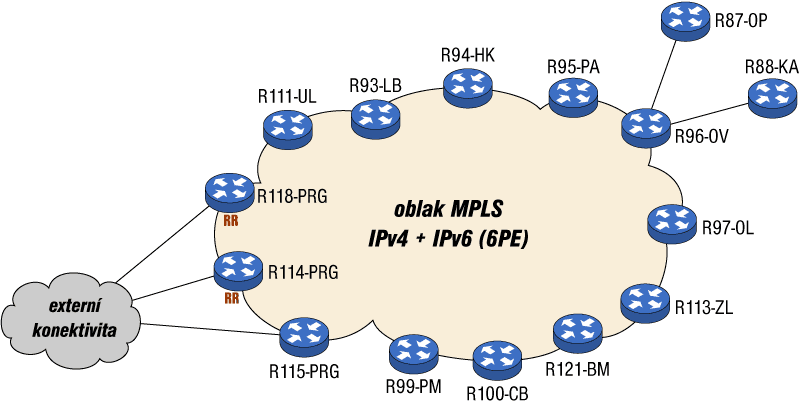
CESNET2 IPv6 Network Topology
We began our IPv6 testbed in 1999. Today, we use 6PE technology to deliver IPv6 traffic over our MPLS network, which means our IPv4 and IPv6 traffic share the same network infrastructure. Both types of data are handled equally in our backbone network.

We are connected to both the GÉANT IPv6 network and the global IPv6 Internet. Since 2004, we have been providing IPv6 as a standard service across all our points of presence in the CESNET2 backbone.
Connecting Your Network to CESNET2 Over IPv6
This section explains how institutions can connect their networks to CESNET2 via IPv6. We will not cover local network issues related to IPv6.
Technical Requirements
To connect to CESNET2 over IPv6, your network needs to be technically prepared for IPv6. The most important aspect is that your border router supports IPv6. Ensure the firmware or software on your router is up-to-date, as many platforms are rapidly evolving.
*We have tested IPv6 connections with Cisco, Linux, and BSD PC routers.
Administrative Steps
Request IPv6 Address Space:
- Contact the CESNET NIC to request an IPv6 address assignment.
- We generally allocate /48 prefixes, which provide up to 65,536 subnets of the standard /64 length.
- Addresses are assigned from the prefix 2001:718::/32 based on your network's geographical location.
Technical steps
1. Interconnection
Dual-Stack Configuration: CESNET2 supports both IPv4 and IPv6 on the same connection (dual-stack). Typically, a single line is used for both protocols. Tunneling is not supported.
Separate Routers: If your border router does not support both IPv4 and IPv6, you will need two routers (one for each protocol) and a Layer 2 switch for connection.
We recommend using a dual-stack router to simplify the network architecture and management.
2. Routing
When configuring routing, in the first place it is necessary to ensure acceptability of address space on all border routers of connected network.
Example for Cisco IOS:
ipv6 route 2001:718:1001::/48 Null0
This configuration ensures that IPv6 traffic is handled correctly and prevents routing loops.
Routing of assigned IPv6 address space can be done statically or dynamically.
Static routing
For a single connection point, static routing is usually sufficient. Set up a default gateway to the CESNET router.
Example Static Route Configuration for Cisco IOS:
ipv6 route ::/0 2001:718:cafe:1::a1 50
Routing of institution address space on the CESNET2 side is also static.
Dynamic routing
For multiple connection points, use BGP for dynamic routing. CESNET2 provides an Autonomous System Number (ASN) from a private range. The ASN is the same for both IPv4 and IPv6.
Example BGP Configuration for Cisco IOS:
router bgp 65050
bgp router-id 1.2.3.4
bgp log-neighbor-changes
neighbor 2001:718:cafe:1::a1 remote-as 2852
neighbor 2001:718:cafe:1::a1 description CESNET IPv6 Router
address-family ipv6
neighbor 2001:718:cafe:1::a1 activate
neighbor 2001:718:cafe:1::a1 soft-reconfiguration inbound
network institution_prefix::/48
exit-address-family
Only the default gateway is propagated over BGP to the connected network. It is possible to propagate more destinations when agreed with CESNET2 network NOC.
Prefix lists or router maps must be added to BGP configuration on the institution side.
CESNET2 network routers accept in the BGP session only address space and AS number assigned to the institution. In the case of multipath connection, it is possible to influence incoming traffic by setting MED on corresponding BGP connections.
